POTTERY STUDIO WITH MR. WALCOTT
Important: this class requires a $10 fee due to the high cost of materials
Class Project Intro to Pottery: Pinch Pots. Explore properties of clay again with this utilitarian design. Study ancient versions of pinch pots form cultures around the world and discuss their functions and design. Practice your own version by making two in class. One will be discarded, the other will be decorated by your personal choice.
I.V.1.3 Understand the use of global themes, symbols, and subject matter in art.
Project 1: We will talk about properties of clay and begin a very basic pinch pot shape. Our goal is to understand the amounts of water needed to keep clay in a "working softness" without drying out and cracking. We will also learn how to Score & Slip, a process instrumental in every clay project where two or more pieces or clay are connected together. Here are examples of the final project we will attempt to recreate, along with a finished class example.
|
|
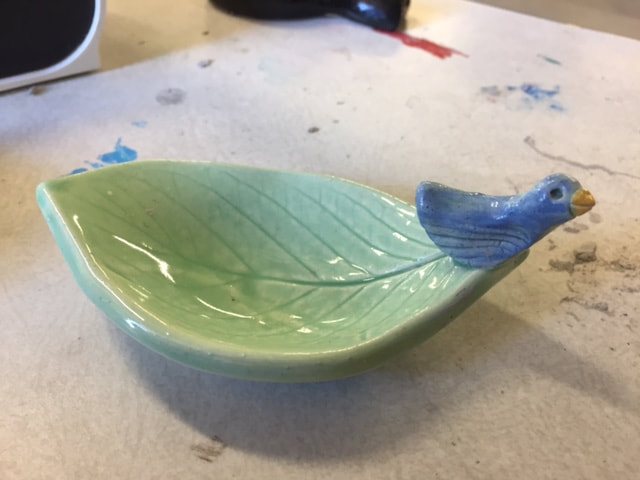
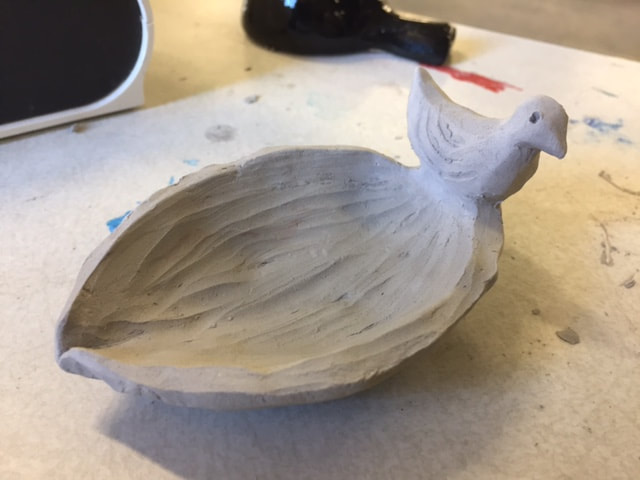
Project 2: Toothbrush Holder. This idea was borrowed from a cool art store on our coast. We are going to take a small ball of clay (size of a small fist) and use it as the base body of an animal. You are going to add a hole that is 50% larger than a toothbrush handle (allowing for shrinking while it dries). Now add details on the base body to turn it into a fun animal or creative figure. Remember to use short and stumpy details so they don't break and attach by smoothing out all seams.
Project 3: Pinch Pot Whistles. Combine learned knowledge of pinch pot hand building and scoring & slipping. Create your own pinch pot based of a "living thing" and apply a whistle technique to make it work. This is done by making a pinch pot, attaching to a base, make a neck and connect, add details to turn it into your creature. I'll walk students though the whistle process so we can make some noise in the room!
I.V.2.2 Use experiences and observations to create content for art.
Project 4: Small Coil Pot. We are following this illustrated web page to ease into the third hand built method- coiling. Follow these steps to make a small, open faced coil container. Add texture by stamping the container as your final step.
Here's a few tips we've found helpful when you begin:
- Make all straight coils first.
- Aim for 10" - 11" long at first
- After you've made 5-6, cut them all the SAME SIZE.
- Roll into spiral coils, sprinkling with water as you go.
- Follow the web site's illustrated steps to connect together
Project 5: Large Coil Pot. Here are the specs for this project-
- research designs (Pinterest link, Jomon Japanese Pottery, or use an animal in your design!)
- draw your own coil pot design and get teacher approval
- height of 8" (no more, no less)
- round base close to size of yogurt container top
- must contain at least 3 designs different than normal coil
- designs shouldn't begin until row 4
- score and slip all connections!
- smooth inside for structural stability!
Project 6: Coffee Mug. Using the slab building method, roll out three pieces for the mug. A 10" x 3 1/2" piece for the wall, then base and handle. Once these three are scored&slipped with no seams showing, apply an additive or subtractive design. Keep it simple...the next will be super creative!
Project 7: Creative Mug. Again, use the slab building method to create a mug. This time, it doesn't have to be functional...but it needs to be creative! Let your imagination run wild:)
Project 8: Symmetrical Designed Sgraffito Plate. Following off the methods of ancient Greece, we will produce our own sgraffito plate by using the drape mold method. Follow these steps to make this project-
1. Trace a foam plate on a piece of drawing paper
2. Cut out the shape
3. Fold the shape three times in half like a pie, making 8 pie pieces
4. Cut out one of the pie pieces.
5. Draw lines and shapes, IN A VARIETY OF SIZES, on the pie piece, filling the composition
6. Roll out a 1/8" slab of clay large enough to fill a foam paper plate
7. Drape the clay onto the foam plate, carefully pushing it into the curves of the plate
8. Cut out the form, being certain to cut straight up and down along the plate edge
9. Paint two thin, smooth layers of the opposite color of clay onto the plate (white on red or red on white)
10. Carefully line up your pie shape to the center of the plate and trace your lines
11. Flip the pie over and trace again
12. Continue this flip trace method until you've filled the clay with your design
13. Scratch out areas of the design to expose the under layer of clay. As a general rule, try and expose 30-50%
Project : Soap Dish Fundraiser. Make 3 soap dishes, two for the class to sell in a fundraiser and one for you to keep. Try different shapes the main body. Roll out or stamp patterns to the slab shape. Attach "feet" under the dish. After the bisque fire, glaze the work and sand glaze off the "high" area so glaze will remain in the design/stamp area (this is called SCRAFFITO). Finally, apply clear glaze over the work to be glaze fired.
Project Story Box. You will be making a slab box with a story illustrated and written on all 5 sides. The sides will be 5” x 5”, the top can be flat or creatively shaped, but should included a creative handle based on your story’s theme. Include quotes, lines and images from the story in a creative way!
Project : Independent Project
Choose your own project for this round! It should begin with research...what will you build, and for who? Sketch out multiple ideas before beginning. After thinking about the size and scope, begin with the understanding that it will be a 1 week project!
Project : Mask Making
Go back in time and look at traditional mask making techniques and decoration. Choose a culture to base a mask from. You can choose a culture that is in your family “bloodline”, or choose one at random you like. Either way, closely study the details, shapes, colors, and additions (other than clay) used to make the masks of the culture. These may be fabric, leather, paper, beads, or other mixed material that will be added after firing.
We first begin with a drape mold pushed inside a plastic mask covered with a plastic bag (to help us remove the clay). After pulling out the mask, we reinforce the underside with balled paper to make sure it doesn’t collapse. You then take time to add details to make the mask. Be true to your chosen culture by adding details specific to ones they would’ve used.
Links to help us along the way:
Brief History of Masks
In Depth History of Masks
Old but Informative Cultural Mask Video
History of Theatrical Masks Video
