ART II CLASS PAGE
"FIRST FIVE" (sKETCHBOOK LIST)
Important- each student will need to supply their own sketchbook. This can be recycled from Art I. It will be used for a daily drawing assignment and will be collected every 2 weeks for a grade.
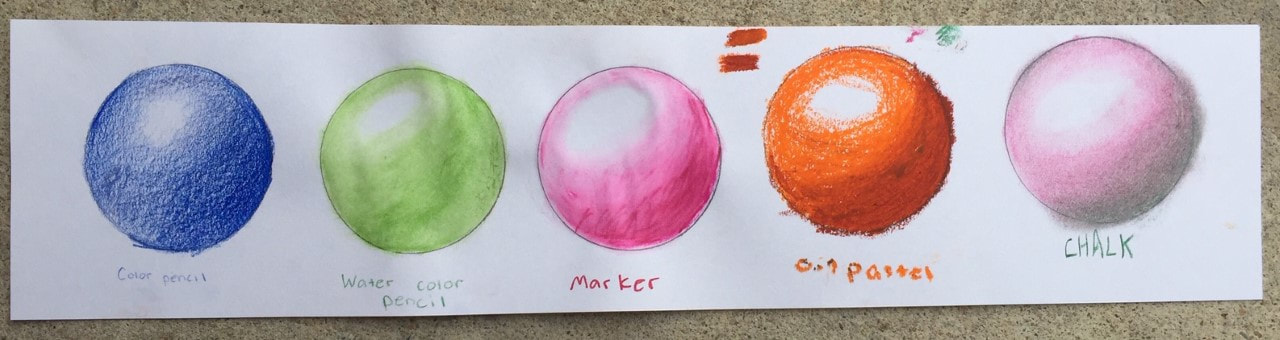
Classroom Exercise: Explore value studies through a variety of mediums. On provided scrap paper, you will freehand 6 circles and shade each in full value scale with pencil, colored pencil, marker, oil pastel, chalk pastel, and watercolor pencil. Notice how each medium works differently then each other. This practice will be vital for the first project.
Project 1: 12 Mediums
You will be given the creative freedom to choose your own subject matter to draw VERY LARGE on a 12" x 18" drawing paper. Using a ruler, draw a grid on your paper of 4" x 6" squares. This will give you 12 areas to explore mediums (2" will be left on top or bottom...I will cut it off for you). Your subject needs to be included in all 12 spaces! Use the list below to decide what medium will go into each space. There are more than needed on the list, so pick and choose as you like.
You will be given the creative freedom to choose your own subject matter to draw VERY LARGE on a 12" x 18" drawing paper. Using a ruler, draw a grid on your paper of 4" x 6" squares. This will give you 12 areas to explore mediums (2" will be left on top or bottom...I will cut it off for you). Your subject needs to be included in all 12 spaces! Use the list below to decide what medium will go into each space. There are more than needed on the list, so pick and choose as you like.
Lead Pencil Color Pencil Watercolor Pencil Watercolor (with or without salt)
Tempera Acrylic Marker with Water Stippling
Chalk Pastel Oil Pastel Oil Pastel Scraffito Pen
Marker Newspaper with Charcoal Magazine Collage
Tempera Acrylic Marker with Water Stippling
Chalk Pastel Oil Pastel Oil Pastel Scraffito Pen
Marker Newspaper with Charcoal Magazine Collage
Note: when applying each medium into spaces to create your image, be sure to remember our VALUE STUDY previously done in class. This will help make the image realistic, three dimensional and textured.
I.V.3.2 Select media appropriate for communicating content.
I.V.3.2 Select media appropriate for communicating content.
Project 2: Surrealistic Collage to Painting
To begin, we will watch this video about surrealism. Skip the middle of the video, there is a fake but possibly disturbing image in the middle (makes me squirm). Watch from the beginning to 6:25, and from 9:50 to the end.
We will also complete a worksheet in class that will help guide our initial thought in this process.
|
This project is laid out into three steps.
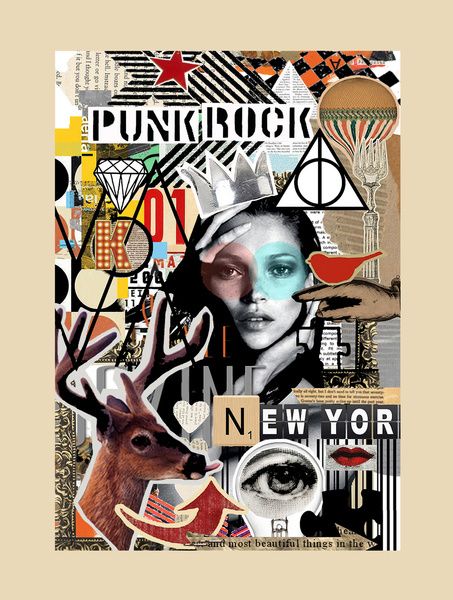
#1- You begin by make an interesting collage. I will provide a 9" x 12" paper, scissors, glue stick and magazines. Completely fill the white space of the paper with magazine cut-outs. They should be both medium and small sizes, but avoid using overly large once that fill too much space (of if you do that, then cover them with more small images!). Use at least 20 cutout images. Feel free to choose a theme, though it's not required. Here is a good example of a random collage: |
|
#2- Now that you've got a composition, use technology to help you create a new composition. Use your phone or the classroom iPad Mini to take a photo of your work. Follow these steps (these specific instructions are for Apple devices):
- open Camera and take a picture of your collage. Be sure to photograph your work from directly top center or it'll be skewed
- open the image in Photos
- tap the 3 lines with circles at bottom to Edit (on iPad Pro, it's just "Edit")
- tap the crop tool (looks like a square with arrows)
- pull the toggle lines into the image and make the crop box smaller. Move the box around the image until you find an interesting composition. Don't zoom in too crazy far, just enough to cut it down at least a quarter of the way. Remember to keep a rectangle!
- tap "done"
- tap the Edit feature again
- tap the three interwoven circles to edit Color
- look through the choices. I recommend Chrome or something that makes the colors bold and deepens the contrast
- tap done or cancel to save your Color choice
- tap the circle with three dots inside (we are still in Edit mode)
- tap "markup"
- find the Magnifier. Use it to zoom into an area of interest. Make it larger or smaller in size and zoom.
- use the Magnifier again, this time changing the size of the circle.
- use the Magnifier a third time if you'd like
- tap done twice to bring you back into regular Photo mode
#3- on 12" x 18" paper, lightly sketch your new composition. I'd recommend focusing on the large lines and shapes first, then begin hammering down details. NEVER BEGIN WITH DETAIL. Once the image is sketched, you will use acrylic to paint the entire image.
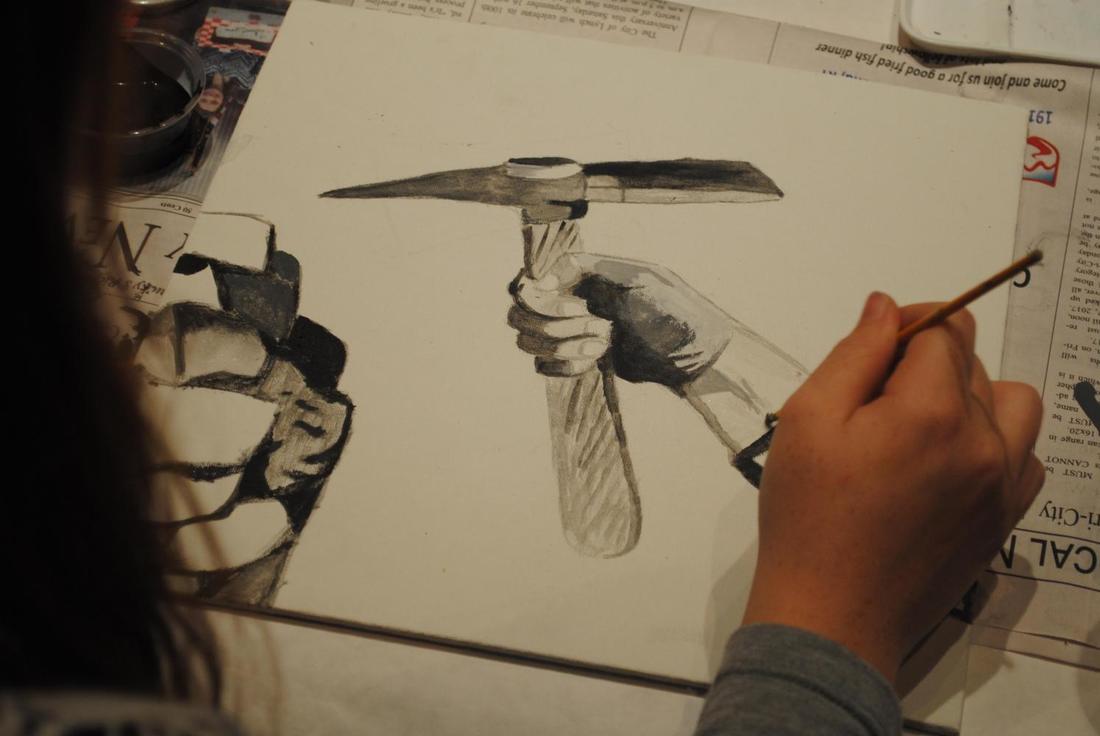
Project : Reflection Drawing
This challenging project will push your drawing and shading abilities! I will give you the choice between many images I photographed. All will have brushes and water in a glass jar under direct lighting. The compositional choice is yours, but your finished image will be drawn entirely in pencil, using additional tools such as paper towel, shading stumps, and erasers. Be sure to use the ENTIRE value scale, meaning your work should show all whites and complete blacks as seen in the photographed copy.
This challenging project will push your drawing and shading abilities! I will give you the choice between many images I photographed. All will have brushes and water in a glass jar under direct lighting. The compositional choice is yours, but your finished image will be drawn entirely in pencil, using additional tools such as paper towel, shading stumps, and erasers. Be sure to use the ENTIRE value scale, meaning your work should show all whites and complete blacks as seen in the photographed copy.

Tiny Art Group Painting
You will use the theme prompt "Coastal" to create your own image and paint it on the provided 4" x 4" canvas. The canvas is provided by a gallery in Frisco, NC and will be sold by them as a fundraising project. We will use -either acrylic or watercolor in addition to watercolor pencil and color pencils.
Project 4: Hands of Washington
You will represent the hand (or hands) of someone from Washington in action. The hand(s) will be actively doing something related to a hobby, passion, skill, career, etc. A story will accompany this image that explains the work, told by the subject him/her self. You will record a short "interview" of the person you are representing so they can explain the action. The artwork and audio recording will be turned in together.
Steps in the process:
In your sketchbook, think of 3 sources for your art. Write/draw for all three-
- name of person
- age
- relationship to you
- action they will do
- why this action is important
- 2 questions you will ask them
- example sketch of the image (use your own hand for this....for now!)
Here is a student example from Kentucky:
I WILL BEGIN COLLECTING YOUR INTERVIEW AUDIO FILES THIS FRIDAY 10/19!
HAVE THEM AVAILABLE ON YOUR PHONE, IN GOOGLE DRIVE, OR ON A FLASH DRIVE.
Build your own Self Portrait in Minecraft using this link
