ART I STUDIO WITH MR. WALCOTT
CLASSROOM SUPPLY LIST
"FIRST FIVE" (SKETCHBOOK LIST)
Unit: LINE
Classroom Assignment: Tools of Drawing. This is a follow-along power point activity where we discuss the power of observation, rethinking the process of "seeing", and how to visually grid. This activity will get you one step closer to understanding the world of an artist!
NC Art Standard B.V.1.2
Classroom Assignment: Tools of Drawing. This is a follow-along power point activity where we discuss the power of observation, rethinking the process of "seeing", and how to visually grid. This activity will get you one step closer to understanding the world of an artist!
NC Art Standard B.V.1.2
Project 1: Doodling! (also known as Zentangle). You will first learn about a variety of doodle styles, from cartoon to patterns and designs of line. Your project will be to fill the space outside the letters "WHS". I will provide a handout and you will have fun doodling all around the letters. Be sure to completely fill the space and think about equal amounts of black and white areas. Ideally, you will use a variety of lines, from thin to thick, and fill in some spaces so there isn't too much black and not too much white- balance is good!
NC Art Standard B.V.1.4
Unit: LINE + VALUE
|
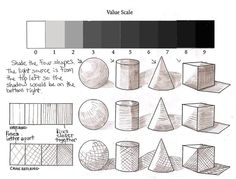
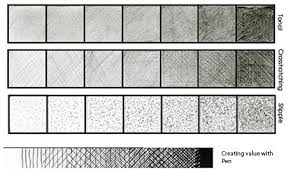
Classroom Assignment: Line and Value Scales. We will learn how basic lines are used in art and how those fit into creating value. We will make 3 value scales with hatching, sketch, and zig zag lines. We will then use those scales to turn basic shapes into forms (cone, cube, circle). Finally, we'll have fun by drawing a cliff scene and a paper folded on the corner of your paper.
(Use this link if you're practicing at home) NC Art Standard B.V.1.4 |
|
Project 2: Personal Symbol. Use personal imagery to form a new symbol to represent yourself. Study symbols from cultures and well known businesses. Create your own symbol based on the rearrangement of your 3 initials. Turn it into a 1" width block letter. Divide it into shapes with random lines and shade every space with a full value scale. Cut out the symbol, glue small blocks of cardboard pieces on back (2 high) and glue your work to black construction paper.
NC Art Standard B.V.2.3
Unit: LINE + VALUE + COLOR
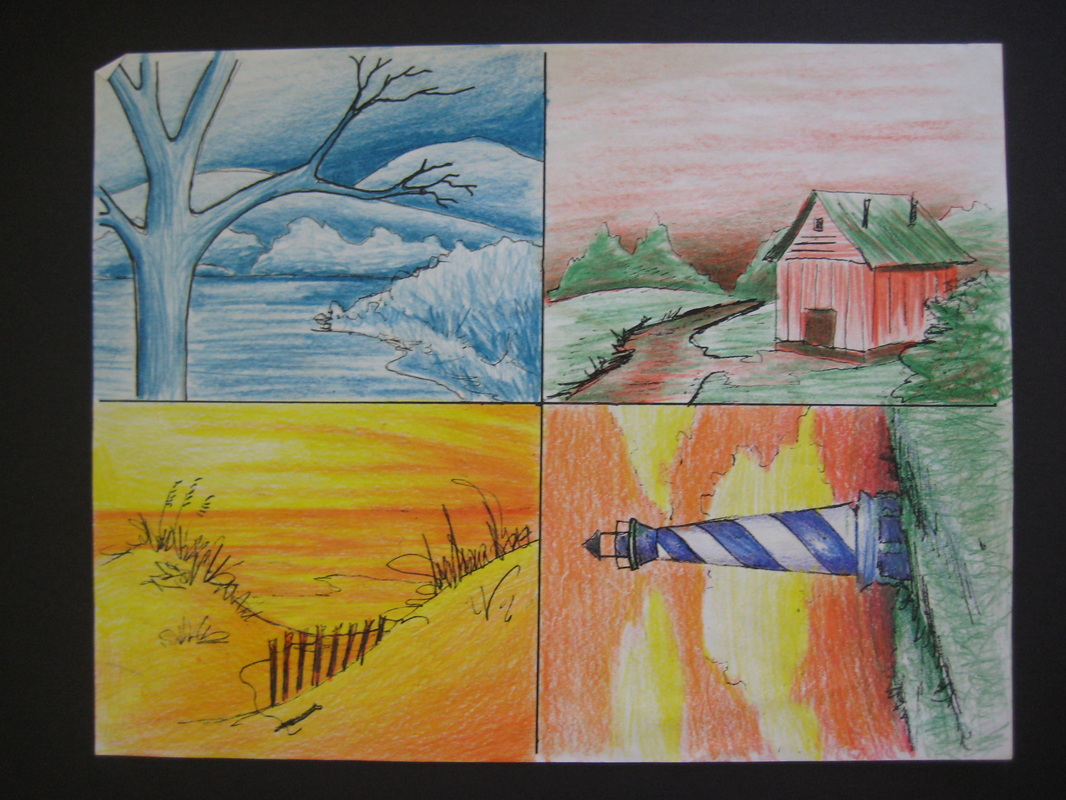
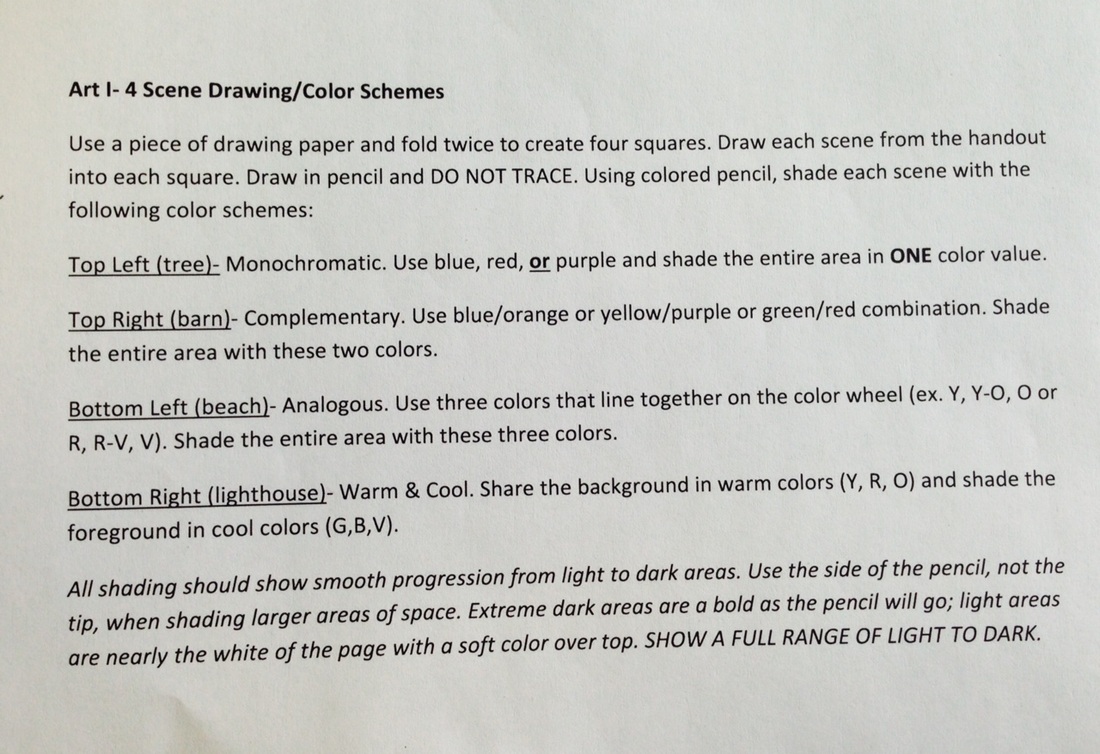
Project 3: Students will receive a hand-out describing this project and another showing 4 scenes. Pencil draw these scenes on copy paper and follow the directions. You will value color shade all areas to discover how color schemes are applied.
Project 4: Symmetrical Square- Use a square piece of provided drawing paper to create your own symmetrical image. This is similar to Egyptian Mandalas because we are using a repeated design to fill in a space (square instead of circle) as a mirror image of itself (symmetry).
Use the following video to teach you how to begin this process:
Radial Balance Square
After you have traced your initial triangle around your square with pencil, you will go over lines with ultra fine or fine tip sharpie.
The final step will be to apply color pencil as a COLOR SCHEMED VALUE SCALE just like the previous landscape project. Choose to use Warm vs. Cool or Complementary colors.
Unit: PORTRAITS
Classroom Assignment- Draw parts of the face as practice for an upcoming assignment. We will take these one at a time and complete each drawing in your sketchbook as reference.
Links to draw parts of the face:
Eye
Nose
Mouth ; Another link to draw from; and try drawing any 3 Manga style mouths from here
Whole Face
Links to draw parts of the face:
Eye
Nose
Mouth ; Another link to draw from; and try drawing any 3 Manga style mouths from here
Whole Face

Project 5: Face Portraiture. You will learn how to draw portraits... faces!... by forming and shading the eye, nose and mouth first. These are done with a combination of light lines, a FEW dark lines, and mostly soft shading (completed with drawing stumps, napkins, cotton swabs, paper towels, etc). The project will be to complete the missing half of a printed face. I give you 1/2 a face, you create the reflection.
Unit: COLOR + SPACE
Classroom Assignment: Practice color wheel with water color sets. You'll need the water color set from the supply list to complete this one-day assignment. The teacher led discussion will have you learning about unique qualities of water color paints while you mix the main 12 colors from primaries.
Classroom Assignment: A two day process to learn more about using this medium:
Wash Techniques
Special Effects
Wash Techniques
Special Effects
|
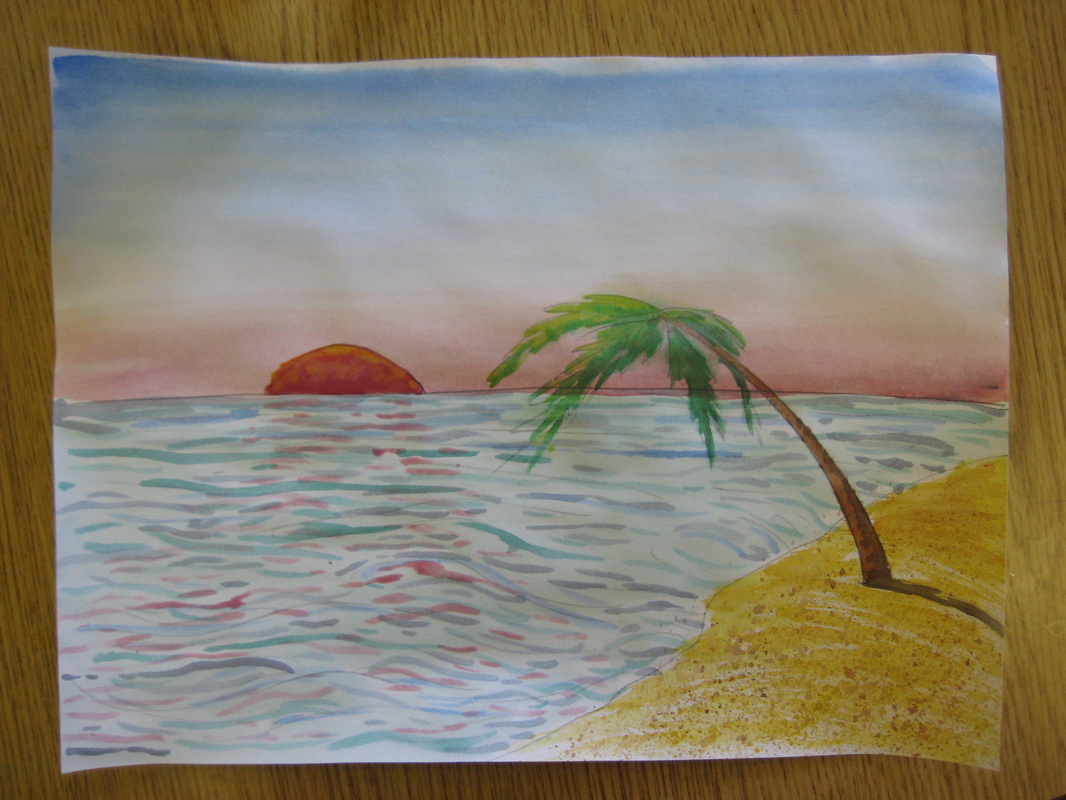
Classroom Assignment: Paint a sunset watercolor through this teacher led discussion. Again, you'll need the water color set from the supply list. This one or two day painting will show you the main techniques of water color painting. We will draw and paint a beach/ocean sunset scene together, step-by-step.
Sky: wet-on-wet Water: Wet-on-Dry Sand: Dry Brush and Splatter Tree: Wet-on-Dry Sun: Wet-on-Dry |
|
Watch this quick, time-lapse video of a watercolor painting demo.
Project 6: Watercolor Scene
You will receive ONE piece of watercolor paper. This is much thicker than regular paper and more costly, so you only get once piece.
You will receive ONE piece of watercolor paper. This is much thicker than regular paper and more costly, so you only get once piece.
- Sketch three scene ideas in your sketchbook, developed from photographs. No graphic images, names, cartoons, or people.
- Draw your favorite on the watercolor paper LIGHTLY! Remember, watercolor is transparent.
- Begin painting the background first with wet-on-wet technique. Remember, never go with a single color...practice using a wide variety of color choices by mixing on your palette. (ex. not just plain green grass, but green, yellow-green, blue-green, green-brown, and even green+red for dark areas)
- Develop subsequent layers that gradually get closer to us. The closest details should be painted last.
- Once dry, paint on more layers to develop more color into the scene.
- Finish by using color pencils to pull out a few crisp details.
2ND 9 WEEKS
Unit: PERSPECTIVE (SPACE)
We will learn how line, shape and space can create three-dimensional FORMS. This technique was created before Leonardo Da Vinci's time and is fundamental to learning how to visually understand and draw our world.
1ST CLASSROOM ASSIGNMENT- Draw from this video to see how to create 3-D cubes in space. Copy all of his notes on your paper, they are important to use EVERY TIME you create a new object in the space.
This will be graded at 30pts.
2ND CLASSROOM ASSIGNMENT- Draw from this video to create a 1-point perspective city. Draw the entire city with details.
This will be graded at 50pts.
Project 7: You will do a large-paper drawing for this project. You have two choices:
Either- Draw from this online tutorial. You will copy most of the buildings and details. If you are having a difficult time with perspective, this is for you.
OR make up your own drawing of a creative city using the theme "Monster Attack!".
BOTH CHOICES SHOULD FOLLOW THIS CRITERIA:
If you choose "Monster Attack!", these are some fun examples to get you going:
(Realize these drawings are in two point perspective, WE ARE DOING ONE POINT PERSPECTIVE!)
Either- Draw from this online tutorial. You will copy most of the buildings and details. If you are having a difficult time with perspective, this is for you.
OR make up your own drawing of a creative city using the theme "Monster Attack!".
BOTH CHOICES SHOULD FOLLOW THIS CRITERIA:
- Main Theme. Be creative!
- At least 10 buildings
- At least one street
- Details (on all buildings and throughout town to illustrate the theme)
- Background
If you choose "Monster Attack!", these are some fun examples to get you going:
(Realize these drawings are in two point perspective, WE ARE DOING ONE POINT PERSPECTIVE!)
CLASSROOM ASSIGNMENT: CRITIQUE OF YOUR 1PT. PERSPECTIVE DRAWING
Use this link to follow the critique.
Use this link to follow the critique.
- Use complete sentences!
- You only need to choose 2 letters per number
- You'll end up answering 8 questions total (2 per number x 4 numbers=8)
Unit: TEXTURE
Project 8: Torn Paper Collage. Working off the practices of Ancient Roman mosaics, we will create our own "peace-meal" work using torn magazine and newspaper.
- Research a subject to focus on as the positive space. It should be large- the dominant element of the composition.
- Draw it onto a large paper, orienting the paper which ever direction you'd like.
- Search magazines for colors that will represent your subject. Look for all value ranges of the colors (light, medium, and darks). Tear out those pages and stack them into piles according to color
- Tear or cut the colors out of the pages. You are making shapes approx. the size of your thumb nail
- Use Mode-Podge to glue down the colors to develop your subject. Be sure to create VALUE within your subject by finding various shades of your chosen color!
- Use Modge-Podge to lay torn newspaper onto the background (negative space).
Once all pieces have been applied to the surface, you will choose either thinned acrylic or watercolor to apply a wash to the negative space. As a final touch, you decide what else the work may need...spray paint, splatter paint, marker lines, more collage, more value, more color, etc.
CLASSROOM ASSIGNMENT: CRITIQUE OF YOUR MAGAZINE/NEWSPAPER COLLAGE
Use this link to follow the critique.
Use this link to follow the critique.
- Use complete sentences!
- You only need to choose 2 letters per number
- You'll end up answering 8 questions total (2 per number x 4 numbers=8)
Unit: TEXTURE + SHAPE + FORM
Classroom Assignment: Get your hands dirty! We are working with clay, so be ready to get some mud under your fingernails. First we are going to complete a worksheet about Ceramics. After reviewing some basic principles of clay, we will try a fun practice round. You will attempt a funny clay figure.
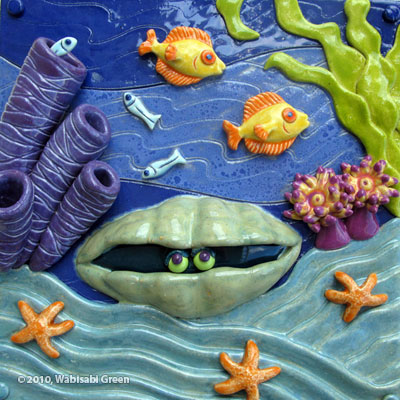
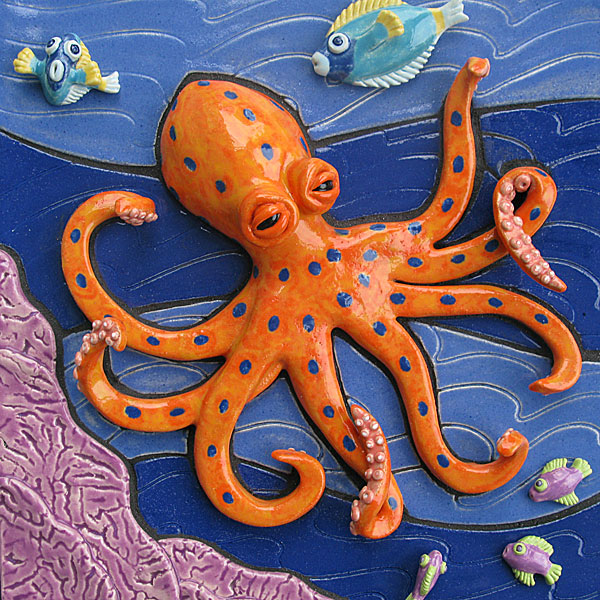
Project 9: Clay Tile Biomes. You will put your clay practice to use into making a clay tile. The theme of this work is an organism within it's biome. First, we will research by answering these questions:
- Research Biomes. Learn about the climate, vegetation, animals, location.
- Choose 2 favorite Biomes.
- Find at least 4 image references for each Biome. These images can include the animals, plants, insects, flowers native to the area and the terrain. Save references to home directory and then place in word document to print out.
- Write 5 sentences about each (of your chosen 2) Biome in your sketchbook. (What about this appeals to me? What types of texture does the scene use? What colors will be included? Where will my focal point be? What image references will I use?)
- Draw scenes of both Biomes. This sketch should include an animal, plant(s), an insect or flower, and terrain specific to the chosen biome. You will choose one of the two as the project.
Examples of Biomes (there are more than this): Deciduous Forest, Desert, Tropical Rainforest, Savanna, Tundra
Your project should meet the following criteria:
- Display your organism as the focal point
- Be exactly 6" x 6" by using the Slab Method
- Incorporate both additive and subtractive design elements
- All spaces need to have texture
- (After it gets fired) All spaces painted in acrylic with color value and with techniques (wash, color mixing, dry brush)
|
|
